SpringCloud总结

SpringCloud

Eureka

生产方和消费方都要注册在Eureka,下图为注册中心模块的配置

1
2
3
@SpringBootApplication
@EnableEurekaServer
public class EurekaApplication {public static void main(String[] args) {SpringApplication.run(EurekaApplication.class, args);}}

建立单点注册中心

1
2
3
4
5
6
7
8
9
10
server:
port: 8761
eureka:
client:
# 是否要注册到其他Eureka Server实例(由于该应用为注册中心,所以无需注册自己)
register-with-eureka: false
# 是否要从其他Eureka Server实例获取数据(注册中心的职责是维护服务实例,不需要去检索服务)
fetch-registry: false
service-url:
defaultZone: http://localhost:8761/eureka/

如果需要添加登录注册中心的账号密码,可以整合SpringSecurity安全框架,参考文章

1
2
3
4
5
6
7
8
9
10
11
12
13
14
15
server:
port: 8761
eureka:
client:
# 是否要注册到其他Eureka Server实例
register-with-eureka: false
# 是否要从其他Eureka Server实例获取数据
fetch-registry: false
service-url:
defaultZone: http://root:root@localhost:8761/eureka/​
spring:
security:
user:
name: root # 配置登录的账号是root
password: root # 配置登录的密码是root

建立高可用注册中心

之前在单节点配置中,注册中心不注册自己,但是它的高可用其实就是体现在注册中心将自己作为服务向其他服务注册中心注册自己,这样可以形成一组互相注册的服务注册中心,来实现服务清单的互相同步

  • 建立application-peer1.properties,作为peer1服务中心的配置,并将serviceUrl指向peer2
1
2
3
4
5
spring.application.name=eureka-server
server.port=1111
eureka.instance.hostname=peer1

eureka.client.serviceUrl.defaultZone=http://peer2:1112/eureka/
  • 建立application-peer2.properties,作为peer2服务中心的配置,并将serviceUrl指向peer1
1
2
3
4
5
spring.application.name=eureka-server
server.port=1112
eureka.instance.hostname=peer2

eureka.client.serviceUrl.defaultZone=http://peer1:1111/eureka/

此时启动2个实例,访问peer1,页面中Replicas显示peer2,同理访问peer2,页面中Replicas显示peer1
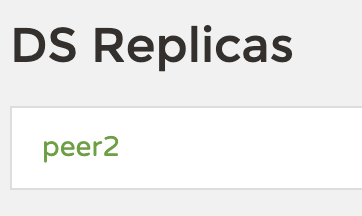
需要注意的是:Springboot当有多个配置时,Active profiles选择dev,那么会把dev配置文件和application.properties文件一起进行配置加载

高可用的服务注册中心集群,必须为域名而不能是ip数字

Provider配置

配置信息

1
2
3
4
5
6
7
8
9
10
11
12
13
14
server:
port: 9000
spring:
application:
# 指定注册到eureka server上的服务名称
name: microservice-provider-user
eureka:
client:
service-url:
# 指定eureka server通信地址,注意/eureka/小尾巴不能少
defaultZone: http://localhost:8761/eureka/
instance:
# 是否注册IP到eureka server,如不指定或设为false,那就会注册主机名到eureka server
prefer-ip-address: true

Consumer配置

配置信息,和Provider的配置除了port和name需要重新设置,其他完全相同

1
2
3
4
5
6
7
8
9
10
11
12
13
14
15
server:
port: 8010
spring:
application:
# 指定注册到eureka server上的服务名称
name: microservice-consumer-movie

eureka:
client:
service-url:
# 指定eureka server通信地址,注意/eureka/小尾巴不能少
defaultZone: http://localhost:8761/eureka/
instance:
# 是否注册IP到eureka server,如不指定或设为false,那就会注册主机名到eureka server
prefer-ip-address: true

Ribbon

Ribbon和nginx的区别

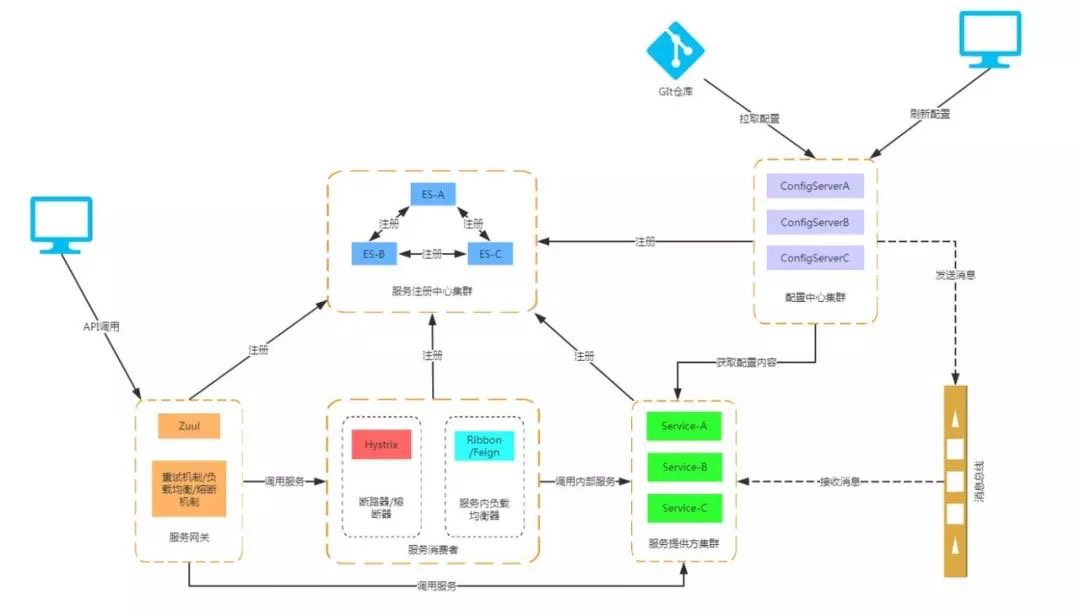
服务的发现任务由Eureka客户端完成,而服务的消费则由Ribbon去完成

客户端(服务消费者)侧负载均衡组件,不同于Nginx(服务端的负载均衡),默认提供了很多的负载均衡算法,例如轮询、随机、响应时间加权等。当然,为Ribbon自定义负载均衡算法也非常容易,只需实现IRule 接口即可
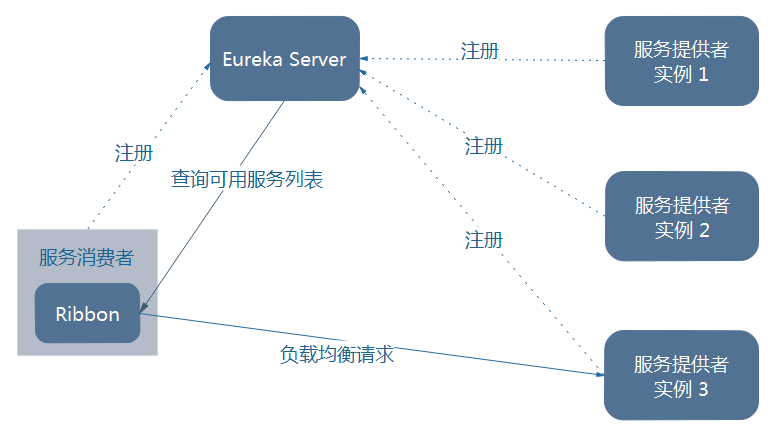
图-Ribbon与Eureka配合

这里代码演示的是使用RestTemplate实现了基于HTTP的远程调用,但是推荐使用Web Client

实现负载均衡步骤

  • 在应用主类Application中添加注解@LoadBalanced在RestTemplate的bean上

    1
    2
    3
    @Bean
    @LoadBalanced
    public RestTemplate restTemplate() {return new RestTemplate();}
  • 在消费端的Controller层,调用restTemplate.getForObject()方法,url使用http://{目标服务名称}/{目标服务端点}的形式,Ribbon会自动在实际调用时,将目标服务名替换为该服务的IP和端口

1
2
3
4
5
6
7
8
9
10
11
12
13
14
15
16
17
18
@RestController
public class MovieController {
@Autowired
private RestTemplate restTemplate;

@GetMapping("/users/{id}")
public User findById(@PathVariable Long id) {
// 这里用到了RestTemplate的占位符能力
User user = this.restTemplate.getForObject(
// http://{目标服务名称}/{目标服务端点}
"http://microservice-provider-user/users/{id}",
User.class,
id
);
// ...电影微服务的业务...
return user;
}
}

这里有个小问题,为了测试负载均衡我们需要开启多个Provider(生产者)实例,以IDEA为例

  • 点击Edit Configurations
  • 右上角的Single instance only取消勾选
  • 开启一个Provider实例后,比如占用了8000端口,那么修改yml配置文件,比如修改为9000端口,再次启动,就生成了8000、9000两个端口实例的Provider

总结小点:Ribbon负载均衡轮询不是以一个方法为单位的,如果一个hello()方法中包含了6个restTemplate调用,那么就会产生多次轮询,每个消费端实例各执行3次调用

RestTemplate GET请求

  • restTemplate.getForEntity 参数如下

    • (String url, Class responseType, Object… urlVariables)
    • (String url, Class responseType, Map<String, ?> urlVariables)
    • (URI url, Class responseType)
  • restTemplate.getForObject

两种方法的唯一区别是getForEntity方法返回3个参数(ResponseEntity<>类型),而getForObject方法只返回body值

  • restTemplate.exchange当比如出现get请求需要附带header信息时,可以使用exchange方法,较为通过的是(String url, HttpMethod method, HttpEntity<?> requestEntity, Class<T> responseType, Object... uriVariables)
1
2
3
4
5
HttpHeaders headers = new HttpHeaders();
headers.add("name", "ymt");
headers.add("age", "24");
HttpEntity<String> requestEntity = new HttpEntity<>(headers);
ResponseEntity<User> resEntity = restTemplate.exchange("http://HELLO-SERVICE/hello2", HttpMethod.GET, requestEntity, User.class);

HttpEntity构造器有3种

  • public HttpEntity(T body)
  • public HttpEntity(MultiValueMap<String, String> headers)
  • public HttpEntity(T body, MultiValueMap<String, String> headers)

RestTemplate POST请求

  • postForObject
1
2
3
4
5
6
User user = new User("didi", 20);
HttpEntity httpEntity = new HttpEntity<>(user);
// 第一种方法request内容被视为完整的body
String postResult = restTemplate.postForObject("http://HELLO-SERVICE/hello3", user, String.class);
// 第二种方法request是个HttpEntity对象,可以往里面添加header信息
String postResult1 = restTemplate.postForObject("http://HELLO-SERVICE/hello3", httpEntity, String.class);
  • postForEntity
  • postForLocation

RestTemplate PUT请求

  • put(String url, Object request, Object... urlVariables)
  • put(URI url, Object request)
  • put(String url, Object request, Map<String, ?> urlVariables)

RestTemplate DELETE请求

  • delete(String url, Object... urlVariables)
  • delete(String url, Map<String, ?> urlVariables)
  • delete(URI url)

自带的负载均衡策略介绍

  • RandomRule 从服务实例清单中随机选择一个服务实例
  • RoundRobinRule 按照线性轮询的方式依次选择每个服务实例
  • RetryRule 具备重试机制的实例选择功能,内部默认为RoundRobinRule,对内部的策略进行反复尝试的策略,若在自定义时间内没有返回具体的服务实例,则返回null
  • WeightedResponseTimeRule 根据权重来挑选实例,实例的平均响应时间越短,则权重区间的宽度越大,则被选中的概率就越高
  • ClientConfigEnabledRoundRobinRule 该策略内部定义了一个RoundRobinRule策略,我们不直接使用它,而是通过继承该策略,默认的choose就实现了线性轮询机制
    • BestAvailableRule 通过遍历所有服务器实例,过滤掉故障实例,找出并发请求数最小的一个,继承自ClientConfigEnabledRoundRobinRule,该算法的核心是loadBalancerStats,当其为null时,该策略是无法执行的,这个时候就采用父类的线形轮询
    • PredicateBasedRule 这是个抽象策略,继承自ClientConfigEnabledRoundRobinRule,先过滤清单,再轮询选择,至于如何过滤需要类去实现它的apply方法
      • AvailabilityFilteringRule 该策略继承自PredicateBasedRule,所以它继承了“先过滤清单,后轮询选择”的基本处理原则。过滤条件:1.是否故障,即断路器是否生效已断开。2.实例的并发请求数大于阈值,默认为2^31-1,可通过<clientName><nameSpace>.ActiveConnectionsLimit来修改。2项满足一项就返回false,即过滤该节点choose方法也有进步,不像父类那样每次都要去遍历过滤,它是通过线形抽样的方式选择一个实例,然后判断它是否满足过滤,如此循环10次如果还是没有找到符合的实例,则采用父类的方法,这样就优化了父类每次都要遍历所有实例的开销
      • ZoneAvoidanceRule 该策略继承自PredicateBasedRule,采用主过滤和次过滤,主过滤完成后的实例再进行次过滤,当符合条件后就不再进行过滤,将当前过滤的结果返回供线形轮询

重试机制
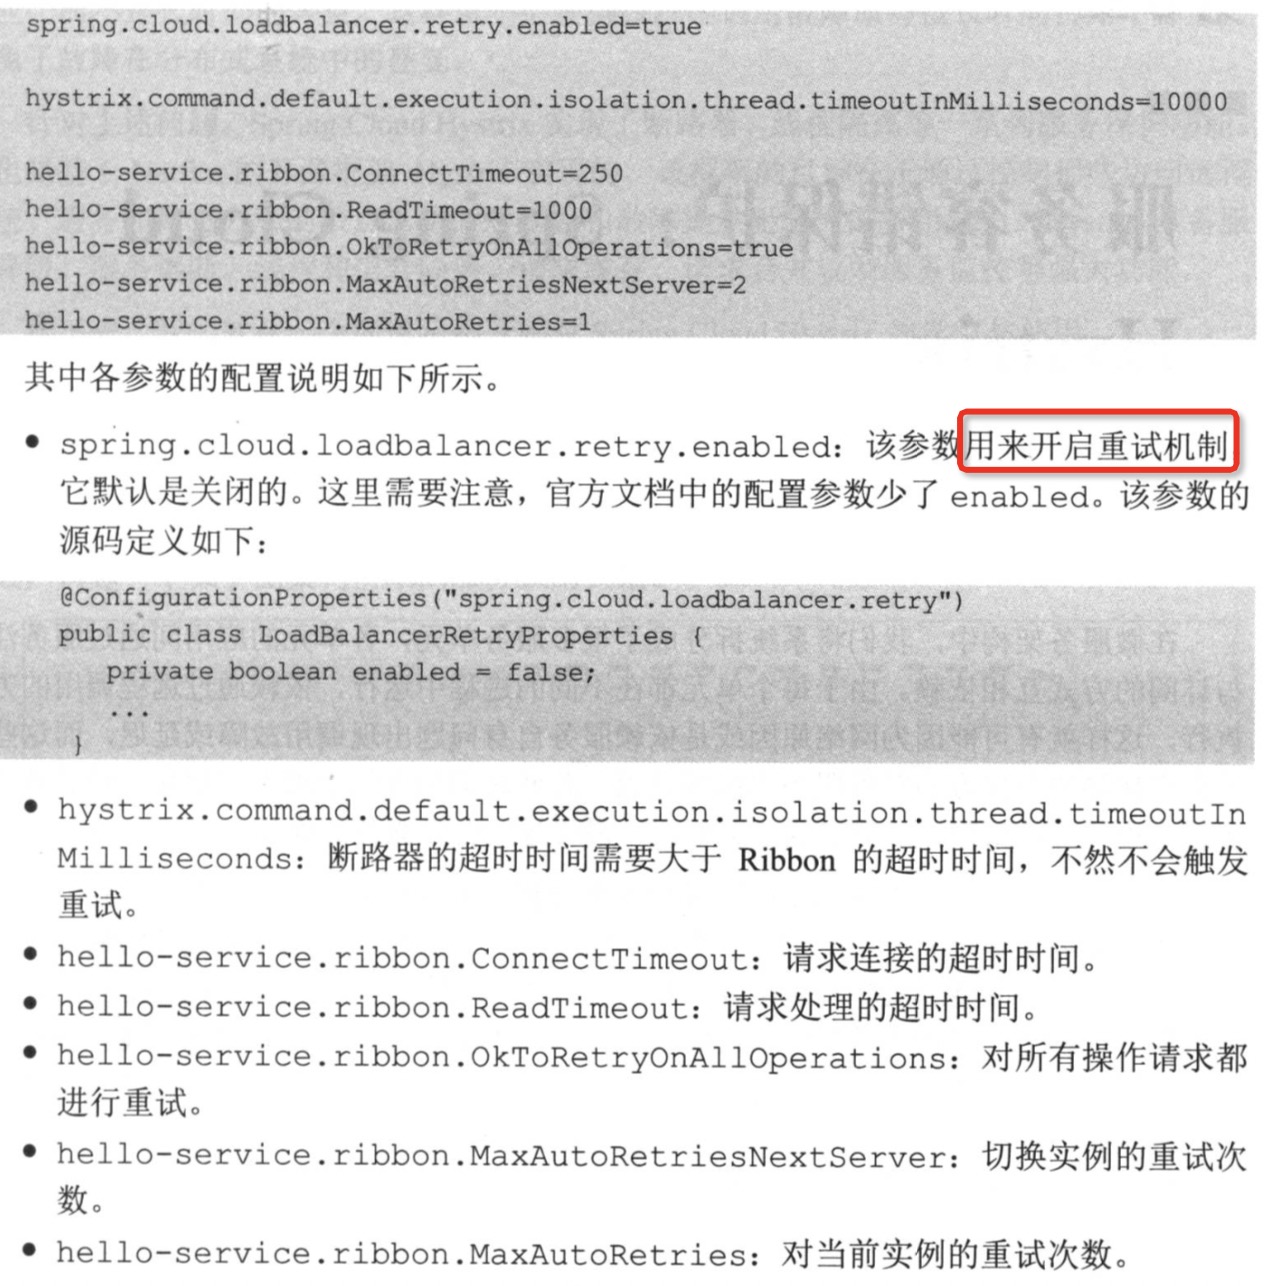
MaxAutoRetriesNextServerMaxAutoRetries决定,当遇到故障请求时,会尝试再访问一次当前实例(次数由MaxAutoRetries设置),超出次数后会切换一个实例进行访问(切换次数由MaxAutoRetriesNextServer决定)

Hystrix

断路器

当某个服务单元发生故障时,通过断路器的故障监控,向调用方返回一个错误响应,而不是长时间等待,占用不释放,这样就不会使故障在分布式系统中蔓延

实时监测应用,如果发现一定时间失败次数/失败率达到一定的阈值,就直接打开断路器,请求直接返回,而不去调用原本的逻辑。打开后过一段时间后进入半开状态,允许调用一次请求,如果成功,断路器关闭,应用恢复正常,如果还是失败,则继续打开断路器,过段时间后再重复操作。

Hystrix实现了服务降级、服务熔断、断路器、线程和信号隔离、请求缓存、请求合并、服务监控等一系列服务保护功能

  • 包裹请求 每个命令都在独立的线程中执行
  • 跳闸机制 当某服务错误率超过一定阈值,可以手动或自动跳闸
  • 资源隔离 如果线程池满,发往该依赖的请求就被立即拒绝
  • 监控 可以实时监控运行指标和配置的变化
  • 回退机制 当请求失败、超时、被拒绝,或当断路器打开时,执行回退逻辑,例如返回一个缺省值
  • 自我修复 断路器打开一段时间后,会自动进入“半开”状态

使用方法

  • 在消费者的工程主类ConsumerApplication中加上@EnableCircuitBreaker注解开启断路器功能(提醒:也可以在工程主类上添加@SpringCloudApplication 该注解包含了@EnableCircuitBreaker@EnableDiscoveryClient,@SpringBootApplication

  • 添加注解@HystrixCommand(fallbackMethod = "helloFallback"),指定回调方法

1
2
3
4
5
6
7
@HystrixCommand(fallbackMethod = "helloFallback", commandKey = "helloKey")
public String hello() {}

// 当出现问题时,返回helloFallback方法
public String helloFallback() {
return "error";
}

Hystrix内部流程

出现故障之后断路器打开实现熔断,紧接着返回降级(fallback)的逻辑去处理

  • 创建HystrixCommandHystrixObservableCommand对象

  • 命令执行

    • execute()同步执行,从依赖的服务返回一个单一的结果对象
    • queue()异步执行

      小知识点:同步就是我强依赖你(对方),我必须等到你的回复,才能做出下一步响应,异步则相反,我并不强依赖你,我对你响应的时间也不敏感,无论你返回还是不返回,我都能继续运行;你响应并返回了,我就继续做之前的事情,你没有响应,我就做其他的事情

    • observe()返回Observable对象,Hot Observable

    • toObservable() 返回Observable对象,Cold Observable

      小知识点:Hot Observable 不论事件源是否有订阅者,都会在创建后对事件发布,所以它的订阅者可能无法看到整个发布的事件Cold Observable则相反,只有发现了订阅者它才会发布事件,它可以保证从一开始看到整个操作的全部过程

  • 结果是否被缓存
  • 断路器是否打开,如果打开进行下一步,否则直接跳到fallback 降级处理
  • 线程池/请求队列/信号量是否占满,如未占满则执行下一步,否则直接跳到fallback 处理

    小知识点:Hystrix所判断的线程池不是容器的线程池,而是每个依赖服务的专有线程池,为了保证不会因为某个依赖服务的问题影响到其他依赖服务而采用了舱壁模式

  • HystrixObservableCommand.construct()或HystrixCommand.run(),如果方法执行时间超过了设定的阈值,则会抛出异常,并执行fallback处理
  • 计算断路器的健康度,Hystrix会将一系列信息,如成功失败拒绝超时等报告给断路器,断路器会统计数据来决定是否要打开断路器
  • fallback处理 也称为服务降级,引起降级的情况如下


    - 断路器处于打开状态
    - 命令线程池、请求队列、信号量被占满
    - HystrixObservableCommand.construct()或HystrixCommand.run()抛出异常
  • 返回成功响应

依赖隔离

Hystrix使用了“舱壁模式”,各个服务之间拥有独立的线程池,互相隔离,优点是

  • 有新的服务添加进去的时候,即使新服务延迟过高,也只是对该依赖的调用产生影响,不会拖慢其他依赖
  • 依赖从失效恢复后,它的线程池会被马上清理干净,比容器级别的清理线程速度要快得多
  • 依赖的服务出现配置问题,线程池会快速做出反应
  • 每个专有的线程池都会提供内置的并发实现

缺点是线程隔离有极微的额外开销,据信息统计,在百分之99的情况下会延迟9ms。虽然大部分场景这个延迟是微乎其微的,但是相对于一些本身就低延迟比如1ms的请求还是非常昂贵的,所以对于足够可靠的依赖服务,我们使用信号量来代替线程池

@HystrixCommand

支持忽略指定异常,如@HystrixCommand(ignoreException={XXXException.class}),这样的话即使触发了XXXException错误,也不会进行fallback处理

异常获取

1
2
3
4
5
6
@HystrixCommand(fallbackMethod = "helloFallback")
public String hello() {}

public String helloFallback(Throwable e) {
return "出现错误" + e.getMessage();
}

命令名称、分组、线程池划分

通过设置@HystrixCommandcommandKey,groupKey,threadPoolKey3个Key值即可

请求缓存

  • @CacheResult设置请求缓存
1
2
3
@CacheResult
@HystrixCommand
public User getUserById(Long id){}
  • @CacheKey定义缓存key
1
2
3
@CacheResult
@HystrixCommand
public User getUserById(@CacheKey("id") Long id){}
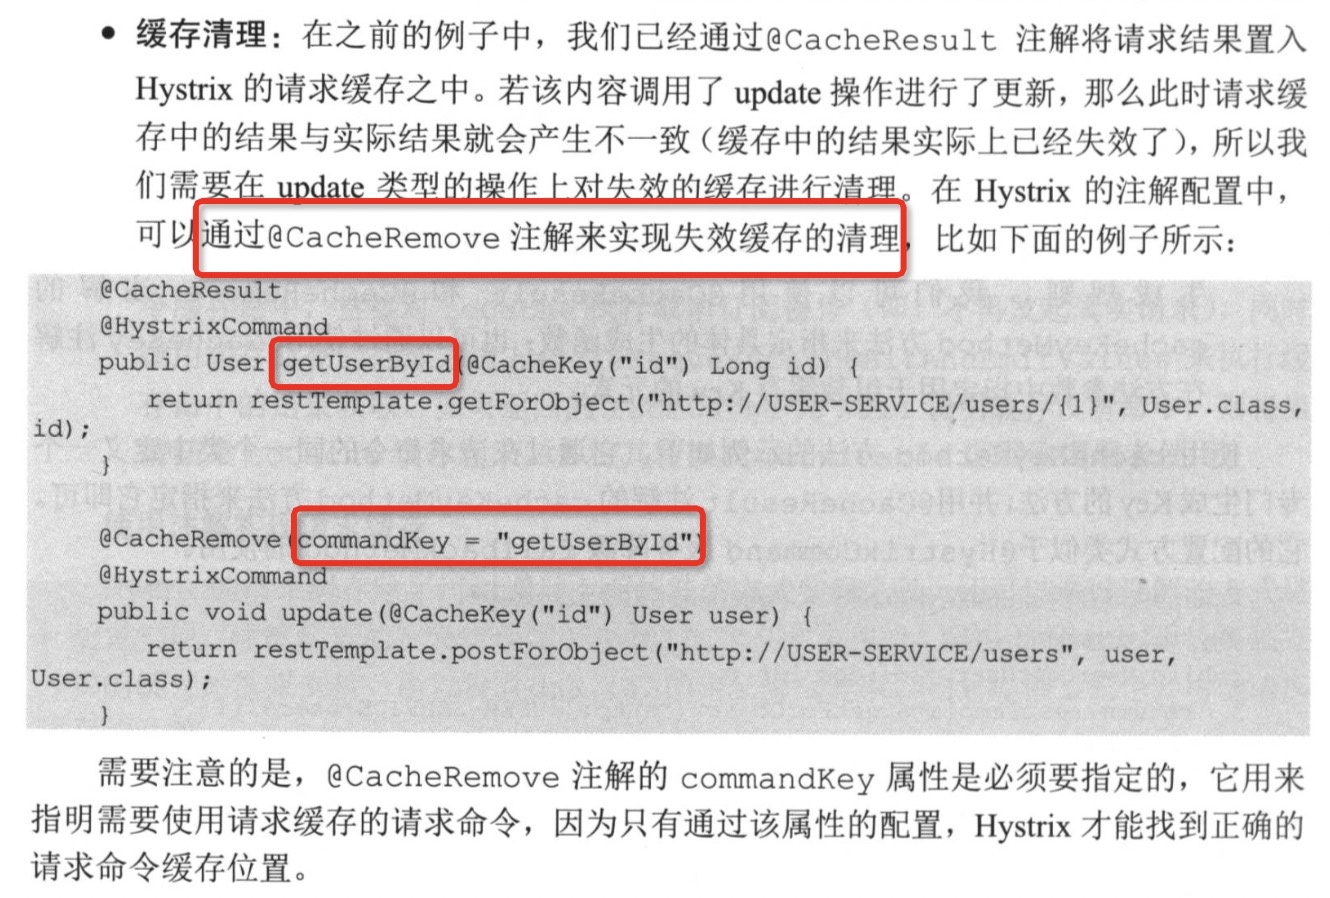
  • 实现缓存清理

  • 实现请求合并

合并原因:远程通信会出现通信消耗和连接数占用问题,因为线程数资源有限,所以会出现请求等待和响应延迟的情况,为了优化问题,出现了请求合并的解决方案

为请求合并器设置一个时间延迟属性,比如说10ms,那么合并器会在该时间内,收集相同对象的请求并将其合并为单个的批量请求
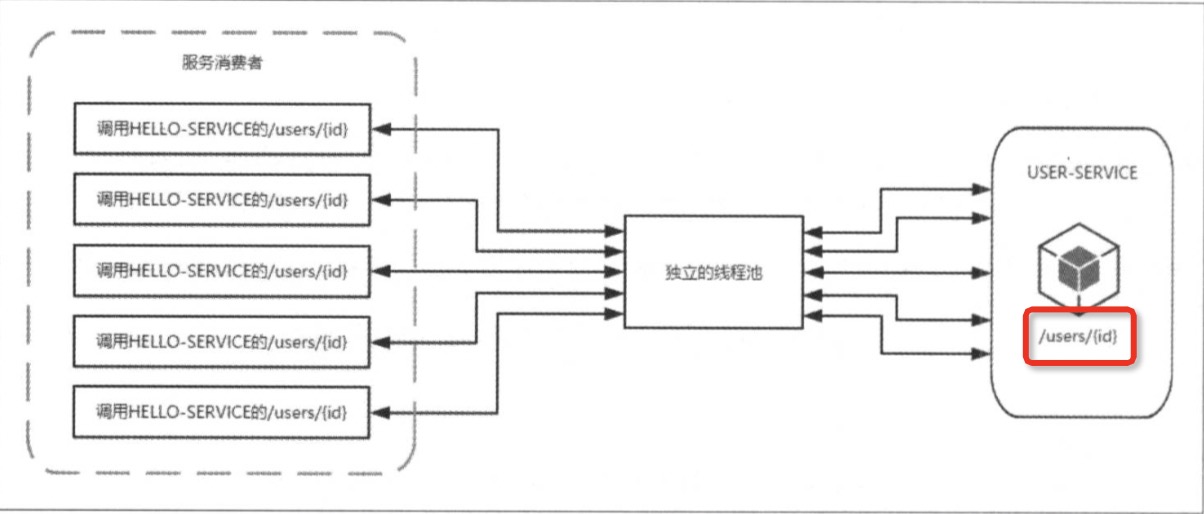
我们可以看到原先的5个请求合并成了1个请求,原先请求的接口为/users/{id}现在变为/users?ids={ids}

1
2
3
4
5
6
7
 /**
* batchMethod 指定了批量请求的方法
* collapserProperties 合并请求器的属性
* timerDelayInMilliseconds 100 请求合并窗设置为100ms
* HystrixCollapserProperties.Setter().withTimerDelayInMilliseconds(100); 请求合并窗设置为100ms另一种写法
*/
@HystrixCollapser(batchMethod = "findAll",collapserProperties = {@HystrixProperty(name = "timerDelayInMilliseconds",value = "100")})

请求合并也要考虑合并窗的延迟和合并窗的并发量,不能随意使用请求合并

Hystrix仪表盘

  • 创建一个普通SpringBoot项目,pom中添加如下,并在启动App中添加@EnableHystrixDashboard
1
2
3
4
5
6
7
8
9
10
11
12
13
14
<dependency>
<groupId>org.springframework.boot</groupId>
<artifactId>spring-boot-starter-actuator</artifactId>
</dependency>

<dependency>
<groupId>org.springframework.cloud</groupId>
<artifactId>spring-cloud-starter-hystrix</artifactId>
</dependency>

<dependency>
<groupId>org.springframework.cloud</groupId>
<artifactId>spring-cloud-starter-hystrix-dashboard</artifactId>
</dependency>
  • 在需要被检测的项目中,pom中添加如下,并在启动App中添加@EnableCircuitBreaker,即可被检测
1
2
3
4
5
6
7
8
9
<dependency>
<groupId>org.springframework.boot</groupId>
<artifactId>spring-boot-starter-actuator</artifactId>
</dependency>

<dependency>
<groupId>org.springframework.cloud</groupId>
<artifactId>spring-cloud-starter-hystrix</artifactId>
</dependency>

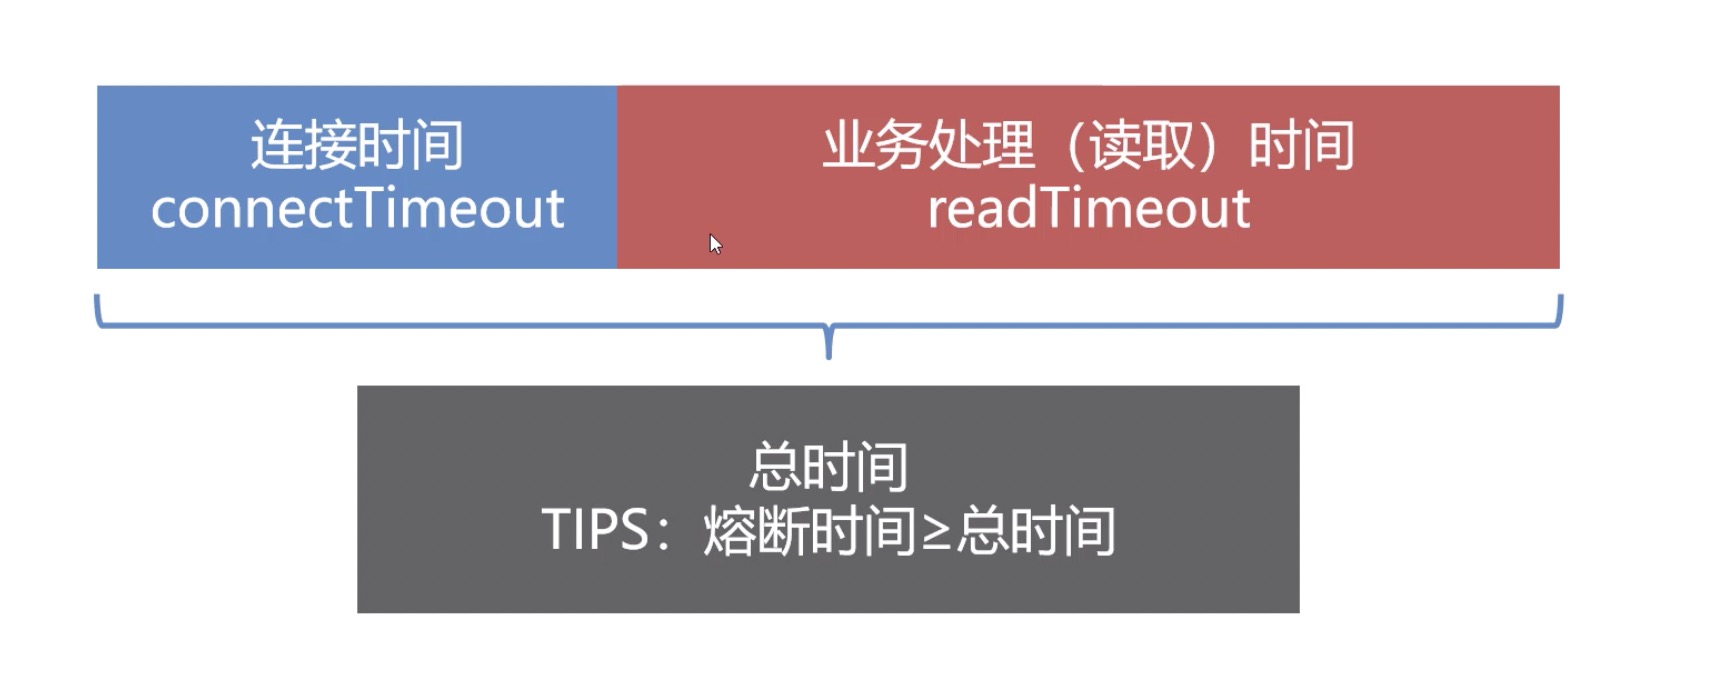
Hystrix时间的配置

openFeign包含了Hystrix,所以只需pom引入openFeign即可实现熔断

强制打开熔断器配置
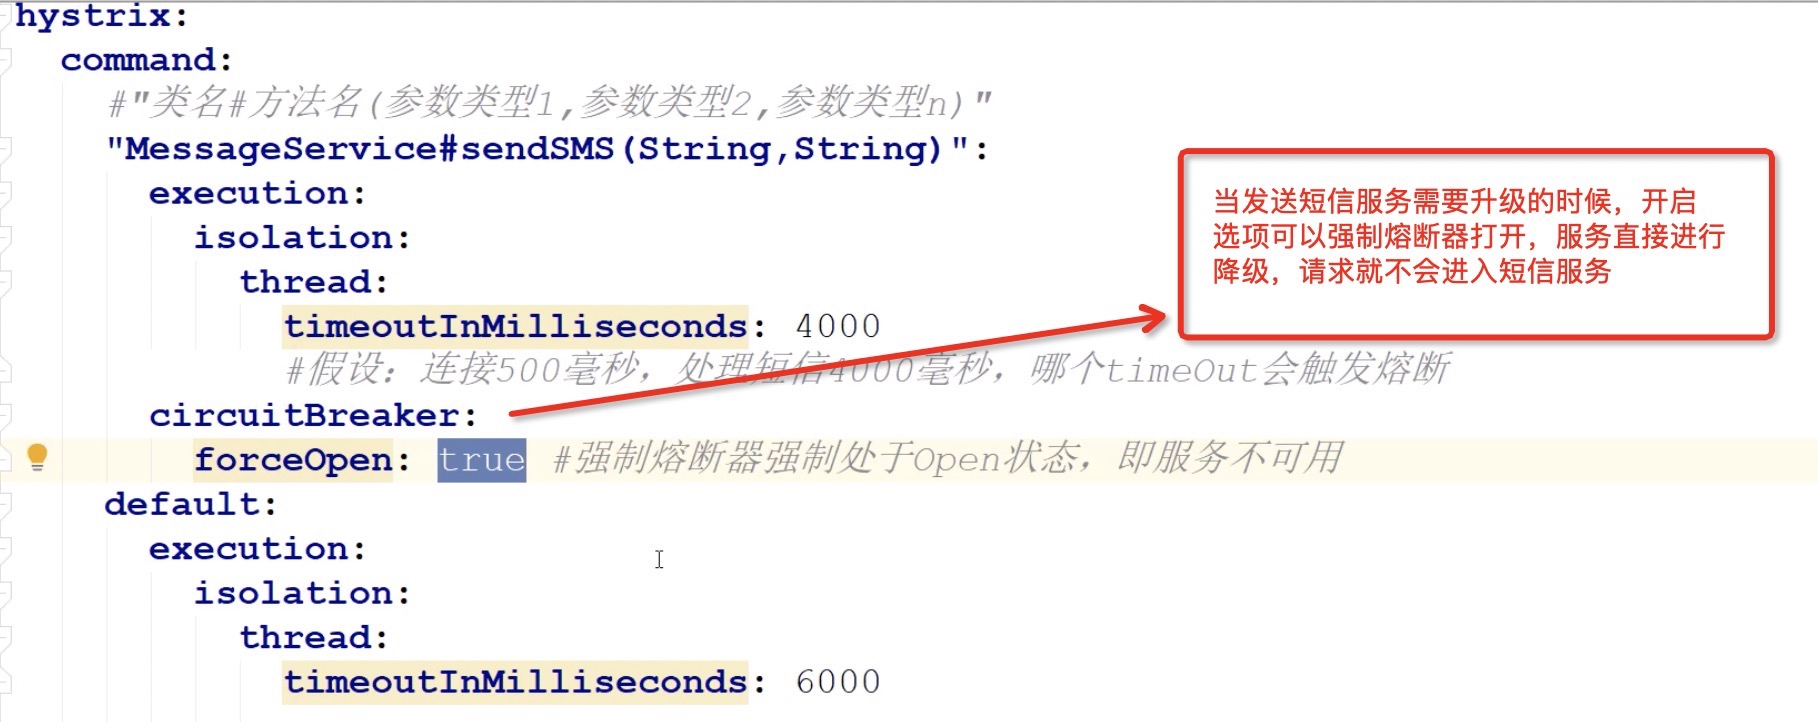
熔断配置
1
2
3
4
5
6
7
8
9
10
11
12
13
14
15
16
17
18
19
hystrix:
command:
default:
execution:
isolation:
thread:
timeoutInMilliseconds: 6000 #熔断超时时间
circuitBreaker:
forceOpen: false
#设置为true一一一一熔断器强制处于Open状态,即服务不可用 #无论做什么,都会进行服务降级
#-好处:当单个服务进行升级的,处于不可用状态,强制停止了与其他服务的通信,直接进入服务降级操作

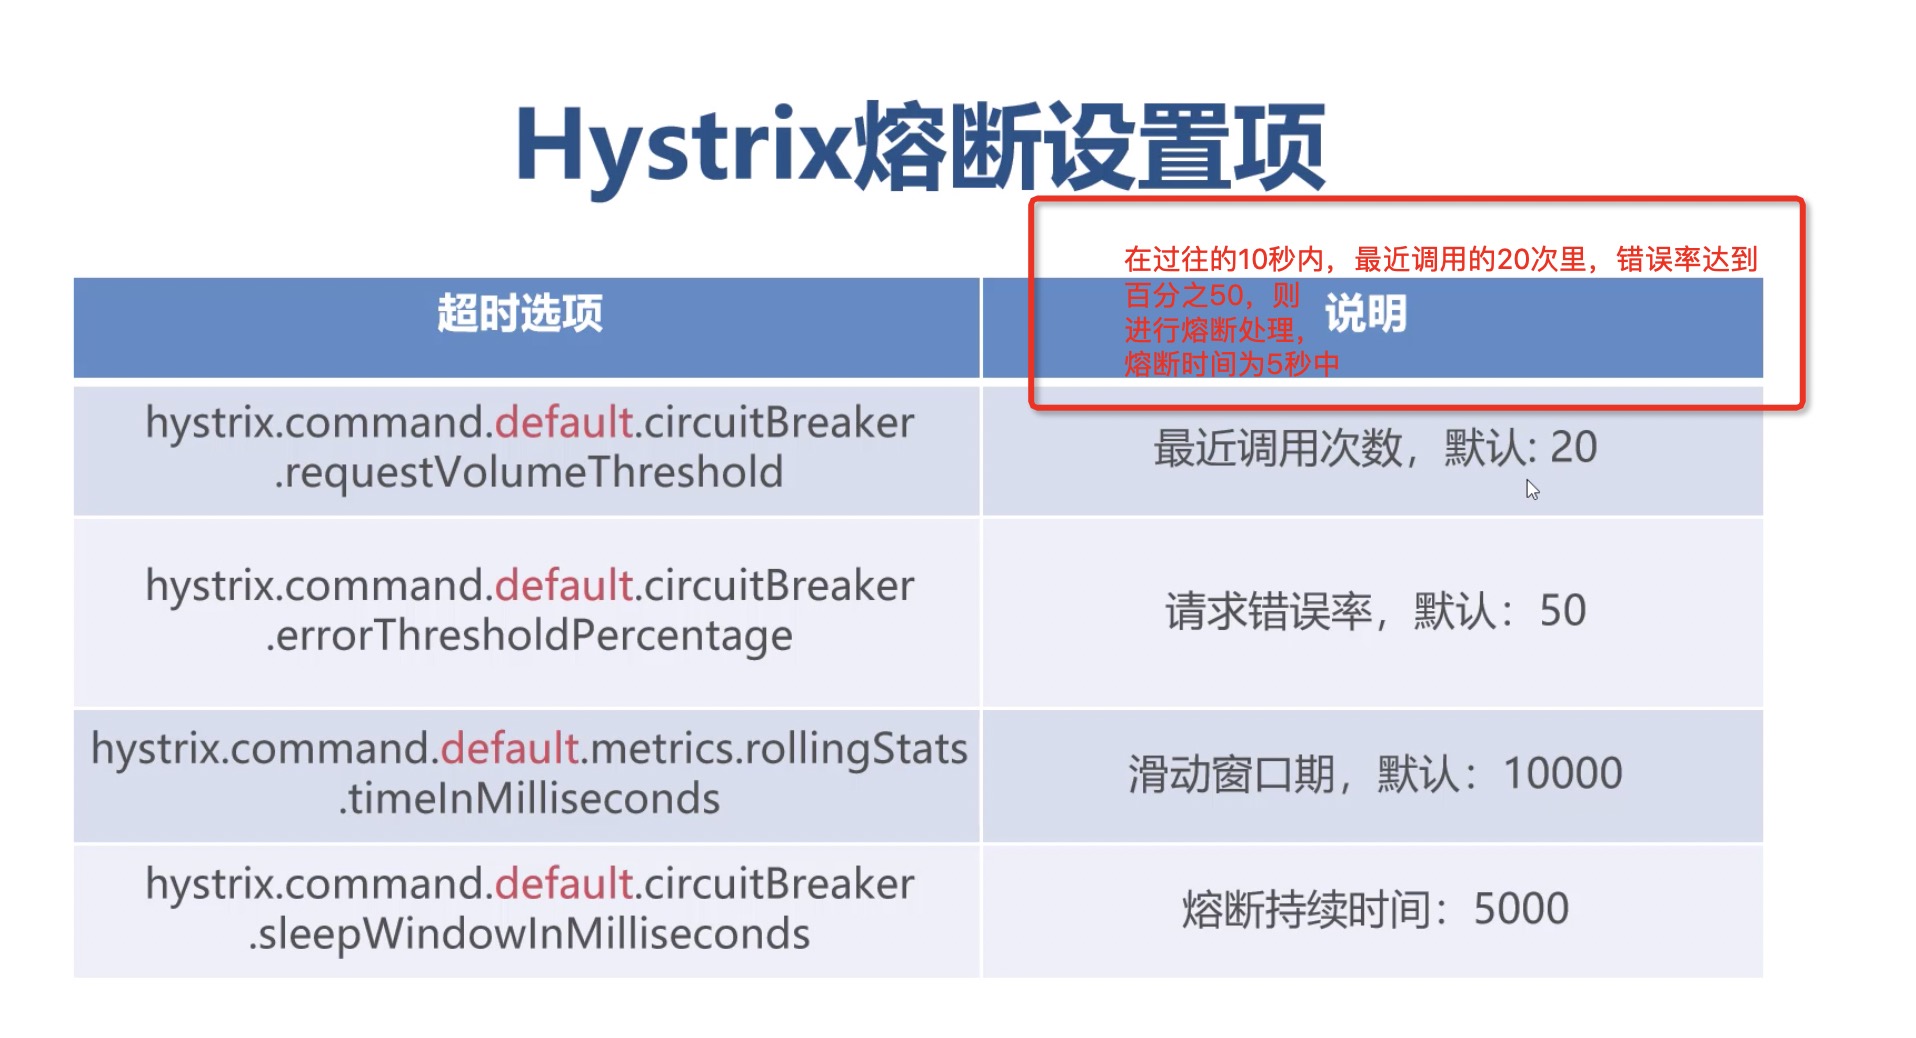
# 当20秒的时间内,最近50次的调用,错误率超过百分之60,则触发熔断10秒中,期间快速失败
requestVolumeThreshold: 50
errorThresholdPercentage: 60
sleepWindowInMilliseconds: 10000
metrics:
rollingStats:
tomeInMilliseconds: 20000

Feign

运行在消费端,帮助我们更加便捷、优雅的调用HTTP API,Feign自带Ribbon和Hystrix

基础写法

  • 在Consumer接口上添加注释@FeignClient,指定服务名来表明服务
1
2
3
4
5
6
7
8
9
// 对应Provider生产者的name,该name写在了对应生产者的yml配置文件中
// 表明会对服务名叫做microservice-provider-user的发起调用,并且降级类为HelloServiceFallback
@FeignClient(name = "microservice-provider-user", fallback = HelloServiceFallback.class)
public interface UserFeignClient {

// 对应Provider生产者的controller的Mapping
@GetMapping("/users/{id}")
User findById(@PathVariable("id") Long id);
}
1
2
3
4
5
6
7
8
9
// 降级类
@Component
public class HelloServiceFallback implements UserFeignClient {
@Override
public User findById(@PathVariable("id") Long id) {
// 具体逻辑省略
return user;
}
}
  • 在Provider层编写Controller层
1
2
3
4
5
6
7
8
9
@RestController
public class providerController {

// 对应Consumer消费者的调用接口的Mapping
@RequestMapping(value = "/users/{id}", method = RequestMethod.GET)
User findById(@PathVariable("id") Long id){
return new User("ymt", id);
}
}

需要注意的是调用方Consumer接口所对应的Mapping必须和Provider的Controller层的Mapping相同,才能够对应起来

  • 使用@Autowire注解,注入在Consumer的Controller层中
1
2
3
4
5
6
7
8
9
10
11
@RequestMapping("/movies")
@RestController
public class MovieController {
@Autowired
private UserFeignClient userFeignClient;

@GetMapping("/users/{id}")
public User findById(@PathVariable Long id) {
return this.userFeignClient.findById(id);
}
}

进一步完善,因为有许多东西需要复制代码会有大量重复,所以从中提取出接口

  • 新建hello-service-api项目
1
2
3
4
5
6
7
8
9
10
11
12
13
14
@RequestMapping("/refactor")
public interface HelloService {

// 注意这里需要添加@RequestMapping
@RequestMapping(value = "/hello4", method = RequestMethod.GET)
String hello(@RequestParam("name") String name) ;

@RequestMapping(value = "/hello5", method = RequestMethod.GET)
User hello(@RequestHeader("name") String name, @RequestHeader("age") Integer age);

@RequestMapping(value = "/hello6", method = RequestMethod.POST)
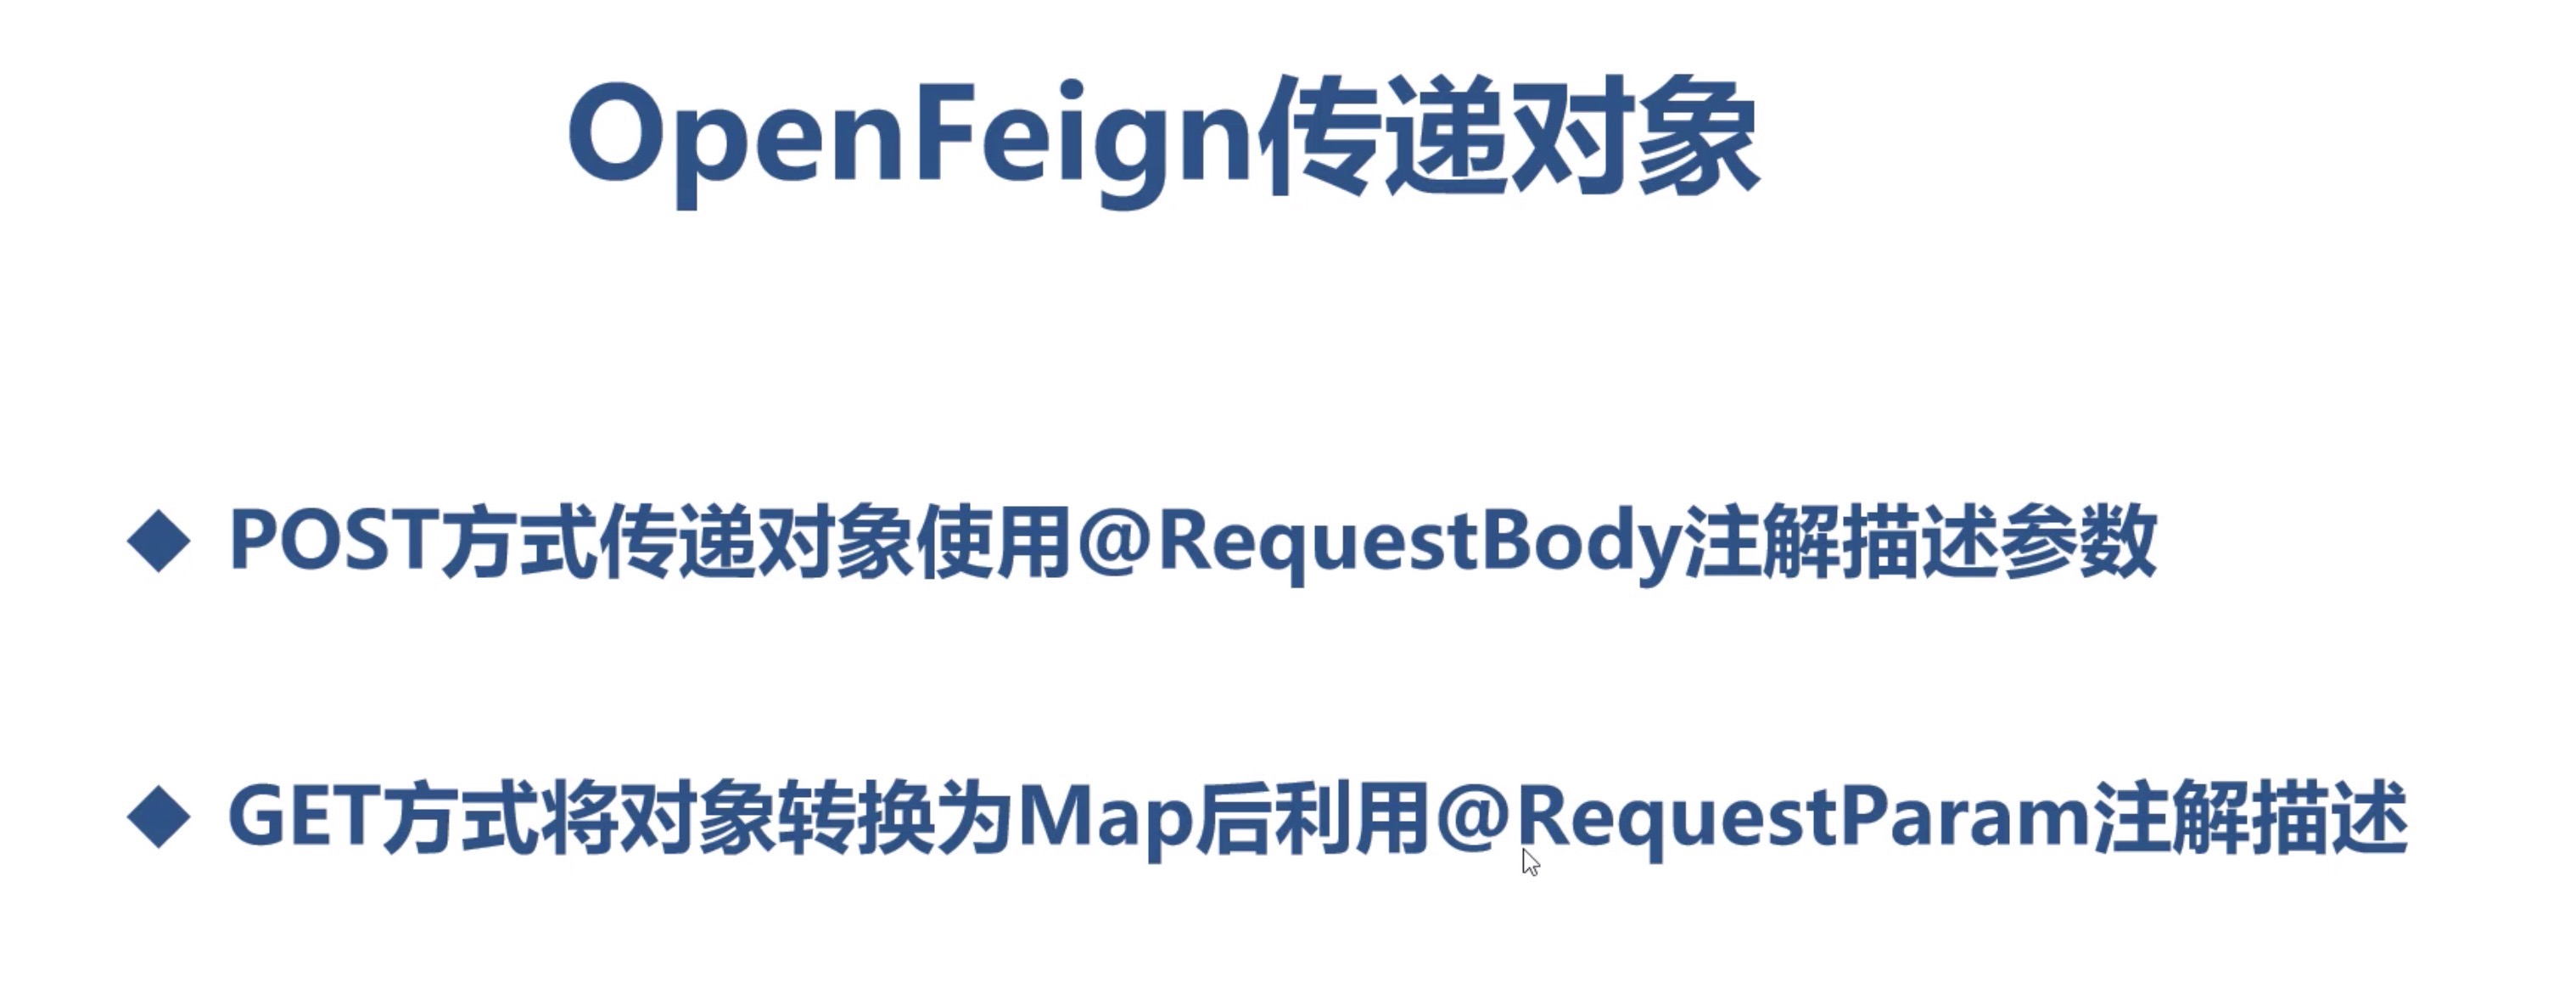
String hello(@RequestBody User user);

}
  • 在调用方feign-consumer 和 服务提供者 hello-service 的pom中添加上api项目
1
2
3
4
5
<dependency>
<groupId>com.didispace</groupId>
<artifactId>hello-service-api</artifactId>
<version>0.0.1-SNAPSHOT</version>
</dependency>
  • 在hello-service 项目中实现hello-service-api项目的HelloService接口
1
2
3
4
5
6
7
8
9
10
11
12
13
14
15
16
17
18
@RestController
public class RefactorHelloController implements HelloService {

@Override
public String hello(@RequestParam("name") String name) {
return "Hello " + name;
}

@Override
public User hello(@RequestHeader("name") String name, @RequestHeader("age") Integer age) {
return new User(name, age);
}

@Override
public String hello(@RequestBody User user) {
return "Hello "+ user.getName() + ", " + user.getAge();
}
}
  • 在feign-consumer项目中创建接口,继承HelloService
1
2
@FeignClient(value = "HELLO-SERVICE")
public interface RefactorHelloService extends com.didispace.service.HelloService {}
  • 在feign-consumer项目的Controller中注入RefactorHelloService实例
1
2
3
4
5
6
7
8
9
10
11
12
13
14
15
@RestController
public class ConsumerController {

@Autowired
RefactorHelloService refactorHelloService;

@RequestMapping(value = "/feign-consumer3", method = RequestMethod.GET)
public String helloConsumer3() {
StringBuilder sb = new StringBuilder();
sb.append(refactorHelloService.hello("MIMI")).append("\n");
sb.append(refactorHelloService.hello("MIMI", 20)).append("\n");
return sb.toString();
}

}

Fegin通过继承特性熔断配置时出现错误Caused by: java.lang.IllegalStateException: Ambiguous mapping,因为继承的时候继承了父类的RequestMapping而导致Mapping重复报错,我这里的解决方法是使用@HystrixCommand,不再靠Fegin来实现Hystrix

Feign中Ribbon的配置

  • 全局配置 ribbon.<key> = <val>
  • 指定服务配置 <服务名>.ribbon.<key> = <val>

Feign中Hystrix的配置

  • 全局配置 hystrix.command.deault
  • 指定服务配置hystrix.command.<CommandKey>

禁用Hystrix

  • 全局关闭 feign.hystrix.enabled = false
  • 局部关闭
1
2
3
4
5
6
7
8
9
@Configuration
public class DisableHystrixConf {

@Bean
@Scope("prototype")
public Feign.Builder feignBuilder() {
return Feign.builder();
}
}

然后在需要禁止的service接口中标注@FeignClient(name="",configuration=DisableHystrixConf.class)

Provider层编写服务逻辑,给出一个@RequestMapping,Consumer层调用逻辑,通过@FeginClient(“服务名”)和@RequestMapping对应到唯一的服务

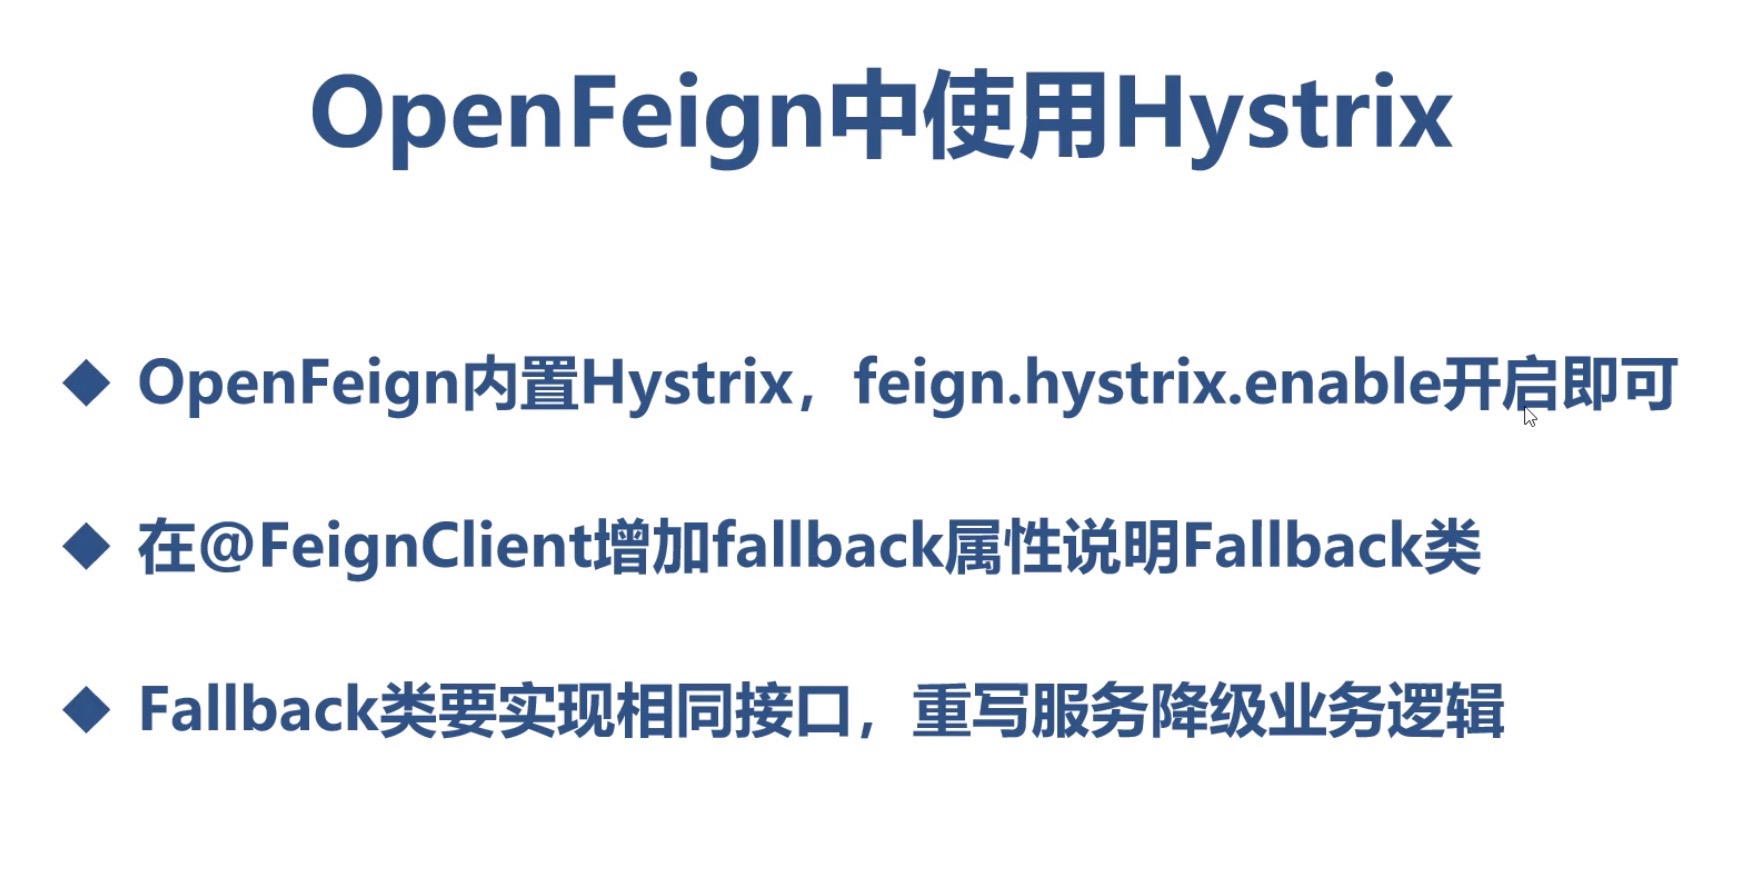
Feign整合Hystrix (默认Feign是不启用Hystrix,如需启用,需要在yml中配置,但如此配置的Hystrix 是全局的)

1
2
3
4
## 所有Feign Client都会受到Hystrix保护
feign:
hystrix:
enabled: true
1
2
3
4
5
6
7
8
9
10
11
12
13
14
// 在注解中添加fallback属性
@FeignClient(name = "microservice-provider-user", fallback = UserFeignClientFallback.class)
public interface UserFeignClient {
@GetMapping("/users/{id}")
User findById(@PathVariable("id") Long id);
}

@Component
class UserFeignClientFallback implements UserFeignClient {
@Override
public User findById(Long id) {
return new User(id, "默认用户", "默认用户", 0, new BigDecimal(1));
}
}

需要注意的是:Feign中绑定参数必须通过value属性来指明具体的参数名,和SpringMVC不同,注解不会根据参数默认值来配置,比如@RequestParam@RequestHeader都必须配置val

  • Hystrix管理图形化界面
1
2
3
4
<dependency>
<groupId>org.springframework.cloud</groupId>
<artifactId>spring-cloud-starter-netflix-hystrix-dashboard</artifactId>
</dependency>

重新立一个子项目,配置给他一个端口即可。可使用重定向功能省去URL的小尾巴,否则需要输入http://localhost:端口/hystrix

  • 在Consumer层,在将需要监控的方法上添上注解@HystrixCommand这样该方法被调用时,就会产生监控信息

  • 默认不开启该端点的暴露,如需开启需要yml中配置

    1
    2
    3
    4
    5
    management:
    endpoints:
    web:
    exposure:
    include: 'hystrix.stream'

此时访问http://localhost:端口/actuator/hystrix.stream即可
Zuul路由

微服务网关,核心是一系列过滤器,比如登陆拦截这一过滤,如果我们采用微服务而不采用网关,那么所有的微服务都需要编写登陆拦截这一逻辑,极不方便程序维护

Zuul配置

新增一个SpringBoot项目,添加注解@EnableZuulProxy开启API网关功能

作用简单说,之前访问url需要输入Consumer的端口然后mapping,现在只需要

http://127.0.0.1:zuul端口/注册到eureka server上的服务名称/mapping实现了反向代理功能

1
2
3
4
5
6
## 这样访问Zuul的/user/1路径,请求将会被转发到microservice-provider-user的/user/1
zuul:
routes:
microservice-provider-user:
path: /user/**
strip-prefix: false
1
2
3
4
5
# 路由配置,这样访问consumer1的服务
zuul:
routes:
consumer1: /FrancisQ1/**
consumer2: /FrancisQ2/**

更多配置

请求过滤

1
2
3
4
5
6
7
8
9
10
11
12
13
14
15
16
17
18
19
20
21
22
23
24
25
26
27
28
29
30
31
32
33
34
35
36
37
38
39
40
41
42
// 继承ZuulFilter自定义过滤
@Component
public class AccessFilter extends ZuulFilter {

private static Logger log = LoggerFactory.getLogger(AccessFilter.class);

// 过滤器类型,这里的pre代表会在request被路由之前执行,还有post代表在Response之前执行,Routing代表路由策略,error代表处理请求时发生错误时被调用
@Override
public String filterType() {
return "pre";
}
// 过滤器的执行顺序,有多个过滤器时,根据返回值来依次执行,越小越先执行
@Override
public int filterOrder() {
return 0;
}
// 什么时候该进行过滤
// 这里我们可以进行一些判断,这样我们就可以过滤掉一些不符合规定的请求等等
@Override
public boolean shouldFilter() {
return true;
}
// 过滤器具体逻辑
@Override
public Object run() {
RequestContext ctx = RequestContext.getCurrentContext();
HttpServletRequest request = ctx.getRequest();
Object accessToken = request.getParameter("accessToken");
if(accessToken == null) {
log.warn("access token is empty");
// 令zuul过滤该请求,不对其进行路由
ctx.setSendZuulResponse(false);
// 对返回的body内容进行编辑
ctx.setResponseBody("错误body");
// 设置返回的状态码
ctx.setResponseStatusCode(401);
return null;
}
log.info("access token ok");
return null;
}
}

Zuul异常处理

1
2
3
4
5
6
7
8
9
10
11
12
13
14
15
16
17
18
19
20
21
22
23
24
25
26
27
28
29
30
31
public class ErrorFilter extends ZuulFilter {

Logger log = LoggerFactory.getLogger(ErrorFilter.class);

@Override
public String filterType() {
return "error";
}

@Override
public int filterOrder() {
return 10;
}

@Override
public boolean shouldFilter() {
return true;
}

@Override
public Object run() {
RequestContext ctx = RequestContext.getCurrentContext();
Throwable throwable = ctx.getThrowable();
log.error("this is a ErrorFilter : {}", throwable.getCause().getMessage());
// 需要注意的是需要定义error.*参数,才能显示报错信息
ctx.set("error.status_code", HttpServletResponse.SC_INTERNAL_SERVER_ERROR);
ctx.set("error.exception", throwable.getCause());
return null;
}

}

禁用过滤器

zuul.<simpleClassName>.<filterType>.disable=true来禁止具体的过滤器执行

Zuul优点

  • 统一了接口样式
  • 可以实现负载均衡的路由转发
  • 将业务实际逻辑和业务不相关的逻辑(比如登陆验证)进行了分离解耦
  • 采用了过滤器,可以在服务逻辑内层做的校验进行前移

Zuul限流

令牌桶限流

1
2
3
4
5
6
7
8
9
10
11
12
13
14
15
16
17
18
19
20
21
22
23
24
25
26
27
28
29
30
31
32
33
34
35
36
37
import com.google.common.util.concurrent.RateLimiter;

@Component
@Slf4j
public class RouteFilter extends ZuulFilter {
// 定义一个令牌桶,每秒产生2个令牌,即每秒最多处理2个请求 要注意的是RateLimiter是引google的包
private static final RateLimiter RATE_LIMITER = RateLimiter.create(2);
@Override
public String filterType() {
return FilterConstants.PRE_TYPE;
}

@Override
public int filterOrder() {
return -5;
}

@Override
public Object run() throws ZuulException {
log.info("放行");
return null;
}

@Override
public boolean shouldFilter() {
RequestContext context = RequestContext.getCurrentContext();
if(!RATE_LIMITER.tryAcquire()) {
log.warn("访问量超载");
// 指定当前请求未通过过滤
context.setSendZuulResponse(false);
// 向客户端返回响应码429,请求数量过多
context.setResponseStatusCode(429);
return false;
}
return true;
}
}

本地跳转

zuul.routes.api-a.path=/api-a/**

zuul.routes.api-a.url=forward:/local

以上所有/api-a的请求都会被API网关转发到/local

设置Cookie与头信息

  1. zuul.sensitive-headers=全局设置,但是不推荐
  2. zuul.routes.<routeName>.sensitive-headers= 将指定路由的敏感词设置为空
  3. zuul.routes.<routeName>.custom-sensitive-headers=true 对指定路由开启自定义敏感头

重定向问题

由于Host设置问题,当重定向时跳转的URL是具体web应用实例的地址,而不是通过网关的统一路由地址

方法:添加配置zuul.addHostHeader=true

Spring Cloud Config

将配置文件上传到Git仓库,之后每次动态刷新配置都会从Git仓库去拉取最新配置

  • 新增一个Springboot项目,启动类添加@EnableConfigServer开启服务端功能
  • 配置类添加如下

Spring Cloud Bus

RabbitMQ

  • rabbitmq-server开启
  • rabbitmqctl stop关闭

链路追踪Sleuth_Zipkin

ZipKin分布式链路追踪系统

赏个🍗吧
0%