Elasticsearch总结

新版本ES规定,同一个index下只能有1个type

过程

Docker 启动kibana和ES

1
2
3
4
docker run --name kibana -p 5601:5601 \
--link elasticsearch:es \
-e "elasticsearch.hosts=http://es:9200" \
-d kibana:6.4.0
1
2
3
4
5
6
docker run -p 9200:9200 -p 9300:9300 --name elasticsearch \
-e "discovery.type=single-node" \
-e "cluster.name=elasticsearch" \
-v /Users/mintaoyu/elasticsearch/plugins:/usr/share/elasticsearch/plugins \
-v /Users/mintaoyu/elasticsearch/data:/usr/share/elasticsearch/data \
-d elasticsearch:6.4.0

7.5.0的版本Docker安装

参考文章

1
2
3
4
5
6
7
8
9
10
11
12
13
14
15
16
## 建立网络
docker network create elastic
## 在主机上创建一个数据目录,并确保 Elasticsearch 容器对该目录具有写权限
mkdir -p /Users/mintaoyu/elasticsearch/data
sudo chown -R 1000:1000 /Users/mintaoyu/elasticsearch/data
1000:1000 是 Elasticsearch 容器内默认的用户和组 ID
## ES
docker run -p 9200:9200 -p 9300:9300 --name elasticsearch \
-e "discovery.type=single-node" \
-e "cluster.name=elasticsearch" \
-v /Users/mintaoyu/elasticsearch/newplugins:/usr/share/elasticsearch/plugins \
-v /Users/mintaoyu/elasticsearch/data:/usr/share/elasticsearch/data \
--network=elastic \
-d elasticsearch:7.5.1
## kibana
docker run --network=elastic -p 5601:5601 --name kibana -d kibana:7.5.1
1
2
## 将容器内的文件拷贝到本地
docker cp 0cfdce848eb1:/usr/share/elasticsearch/config /Users/mintaoyu/elasticsearch/conf

关于kb启动Kibana server is not ready yet问题

  • 一个是初始化的问题,等半分钟即可
  • 如果很长时间后还是这样,那么查看Kibana日志,如下
1
2
3
{"type":"log","@timestamp":"2022-06-15T03:27:12Z","tags":["info","migrations"],"pid":8,"message":"Creating index .kibana_2."}
{"type":"log","@timestamp":"2022-06-15T03:27:12Z","tags":["warning","migrations"],"pid":8,"message":"Unable to connect to Elasticsearch. Error: [resource_already_exists_exception] index [.kibana_2/ChaKJEveQIakmWS6N1gETA] already exists, with { index_uuid=\"ChaKJEveQIakmWS6N1gETA\" & index=\".kibana_2\" }"}
{"type":"log","@timestamp":"2022-06-15T03:27:12Z","tags":["warning","migrations"],"pid":8,"message":"Another Kibana instance appears to be migrating the index. Waiting for that migration to complete. If no other Kibana instance is attempting migrations, you can get past this message by deleting index .kibana_2 and restarting Kibana."}

那么此时查看

1
2
http://esip:9200/_cat/indices
http://esip:9200/_cat/aliases

如果有出现.kibana_task_manager_1这就是资源已存在的原因了,解决方法如下

1
curl -X DELETE http://esip:9200/.kibana*

如果开启了X-pack记得账号密码别忘

Docker配置X-pack(7.5.0版本)

1
2
3
4
5
6
7
8
9
10
# 配置跨域
http.cors.enabled: true
http.cors.allow-origin: "*"
http.cors.allow-headers: Authorization,X-Requested-With,Content-Length,Content-Type
#设置为false以禁用X-Pack机器学习功能
xpack.ml.enabled: false
#开启X-Pack插件
xpack.security.enabled: true
#开启es https访问,开启需要设置证书 看需求
xpack.security.transport.ssl.enabled: false
  • 进入es容器,输入./bin/elasticsearch-setup-passwords interactive 手动设置密码
  • 重启容器
  • 如果配置了Kibana密码,则需要进入Kibana容器,打开kibana.yml
1
2
3
4
# 账户是默认的
elasticsearch.username: "elastic"
# 密码是自己设置的
elasticsearch.password: "123456"
  • 同样的Spring配置如下
1
2
3
4
5
6
7
8
9
10
11
spring:
data:
elasticsearch:
#开启Elasticsearch仓库
repositories:
enabled: true
elasticsearch:
rest:
uris: 127.0.0.1:9200
username: elastic
password: 123456

参考

Elasticsearch7.5.0安全(xpack)之身份认证

Install X-Pack

ES数据迁移

1
2
3
4
5
6
7
8
# 每次迁移默认100条数据,可用--limit指定条数
# --ignore-errors 默认情况下为false,表示遇到错误数据时,停止数据迁移
# 迁移单个索引数据
elasticdump --limit 1000 --input=http://192.168.0.158:9200/indexmapping --output=http://elastic:XXX@101.37.25.244:9200/indexmapping --type=data
# 迁移全部数据
elasticdump --input=http://192.168.0.158:9200/indexmapping --output=http://elastic:XXX@101.37.25.244:9200/indexmapping --all=true
# 只迁移索引mapping
elasticdump --input=http://192.168.0.158:9200/indexmapping --output=http://elastic:XXX@101.37.25.244:9200/indexmapping --type=mapping

数据迁移优化参考

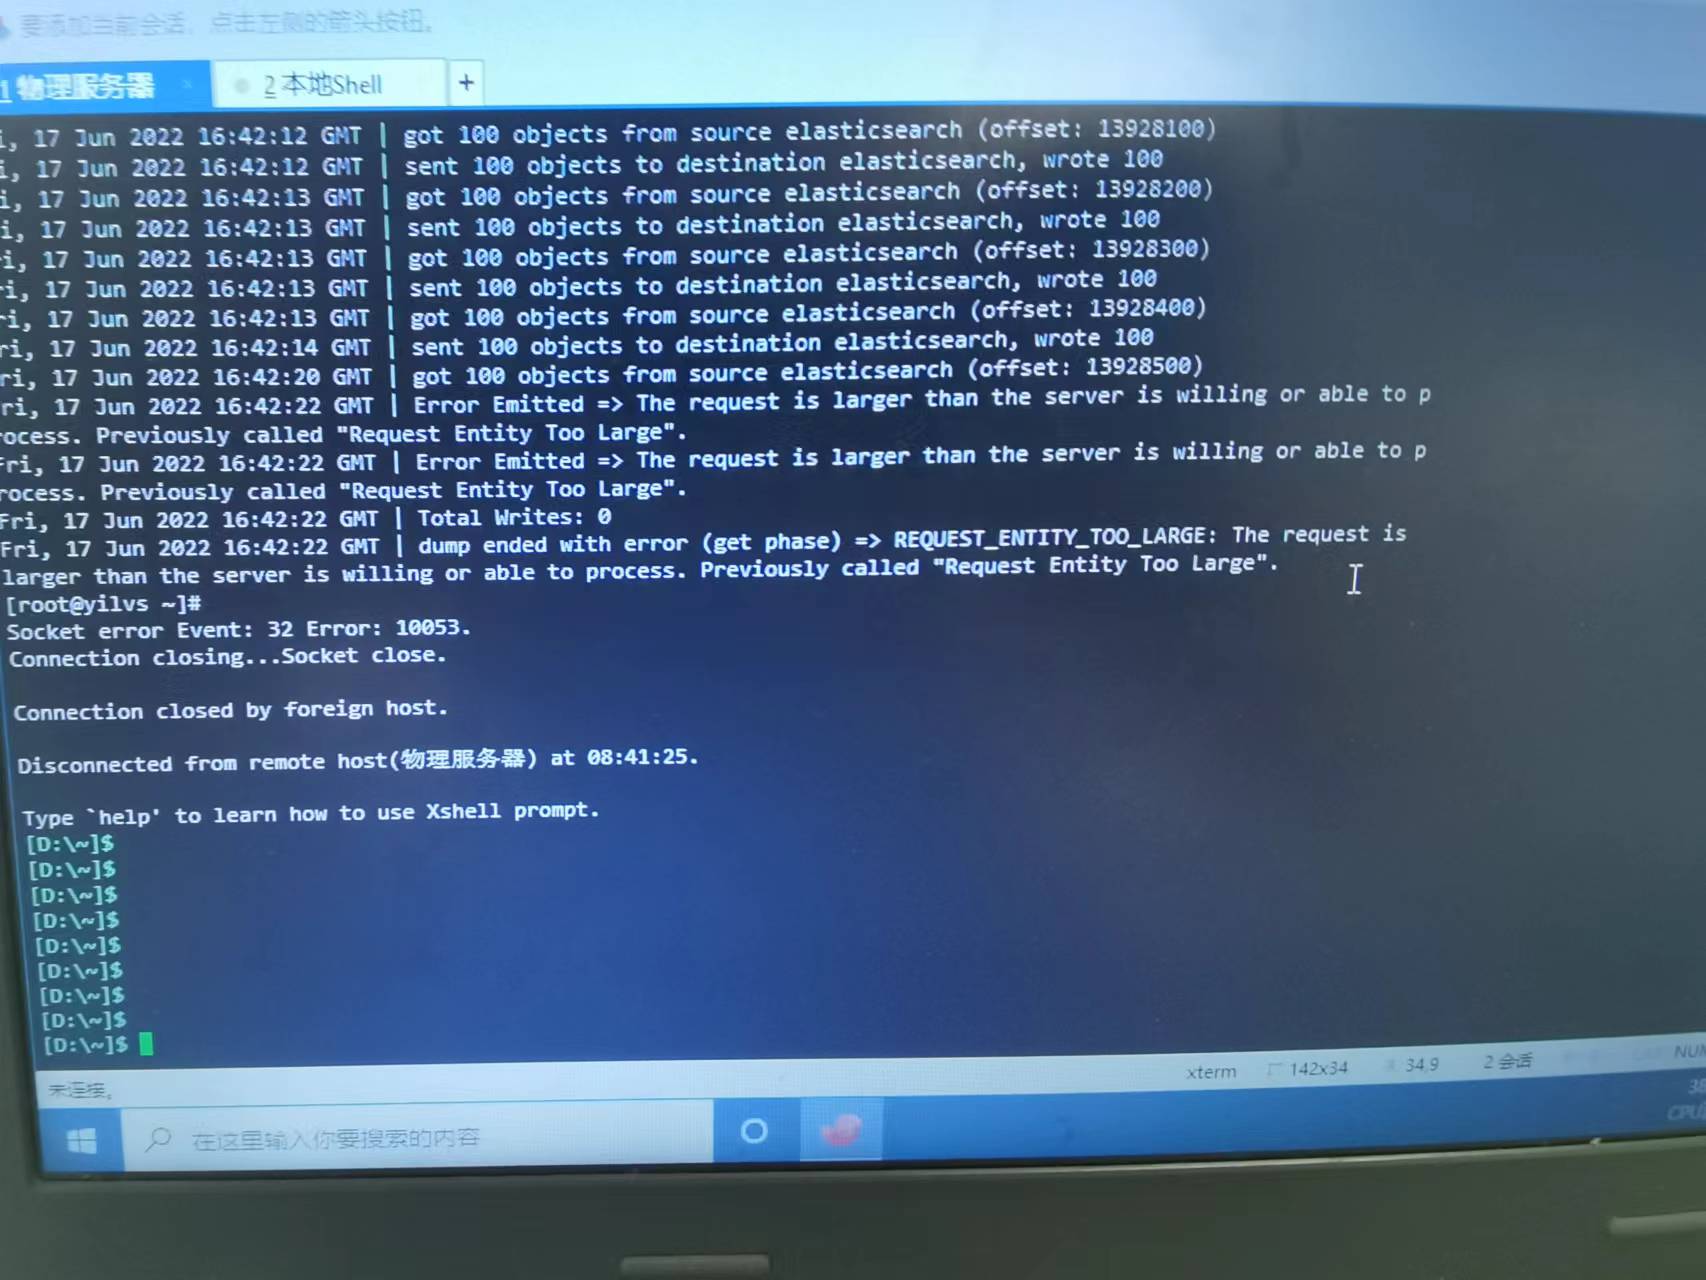
Request Entity Too Large

设置elasticsearch.ymlhttp.max_content_length值,默认为100mb

Entity content is too long [XXX] for the configured buffer limit [XXX]

配置es的buffer大小,这里设置为Integer.MAX_VALUE,可根据实际情况调节

1
2
3
4
5
6
7
8
9
10
11
12
13
14
15
16
17
18
19
20
21
22
23
24
25
26
27
28
29
30
31
32
33
@Configuration
public class MvcConfig implements WebMvcConfigurer {
@Override
public void addInterceptors(InterceptorRegistry registry) {
registry.addInterceptor(new HandlerInterceptor() {
private boolean isSetBuffer = false;
@Override
public boolean preHandle(HttpServletRequest request, HttpServletResponse response, Object handler) throws Exception {
if (isSetBuffer) {
return true;
}
//设置es查询buffer大小
RequestOptions requestOptions = RequestOptions.DEFAULT;
Class<? extends RequestOptions> aClass = requestOptions.getClass();
Field aDefault = aClass.getDeclaredField("httpAsyncResponseConsumerFactory");
aDefault.setAccessible(true);
Field modifiersField = Field.class.getDeclaredField("modifiers");
modifiersField.setAccessible(true);
modifiersField.setInt(aDefault, aDefault.getModifiers() & ~Modifier.FINAL);
//设置默认的工厂
aDefault.set(requestOptions, new HttpAsyncResponseConsumerFactory() {
@Override
public HttpAsyncResponseConsumer<HttpResponse> createHttpAsyncResponseConsumer() {
//设置缓存大小,默认为100mb
return new HeapBufferedAsyncResponseConsumer(Integer.MAX_VALUE);
}
});
isSetBuffer = true;
return true;
}
});
}
}

ES快照创建和恢复

因为elasticdump的大数据量效率问题,所以经过了解知道了ES具备快照功能,7.5操作如下

  • 配置elasticsearch.yml,添加path.repo: ["快照存放的路径"]记得创建的文件夹权限设置下,否则会报错,类似于chmod -R 777 /文件夹

  • 注册快照仓库repository到ES中

1
2
3
4
5
6
7
PUT /_snapshot/es_backup
{
"type": "fs",
"settings": {
"location": "快照存放的路径"
}
}
  • 为指定索引创建快照
1
2
3
4
5
6
7
8
9
10
11
12
13
14
15
16
17
18
19
20
21
22
23
24
25
26
27
28
29
30
31
32
33
34
35
36
37
38
39
40
41
# 快照名称这里设置为snapshot_1,需要创建快照的索引为robots_qa
PUT /_snapshot/es_backup/snapshot_1
{
# 如果要为所有索引创建快照,这里可采用*,默认也为*
"indices": "robots_qa",
"include_global_state": false
}

# 查看快照是否创建完成,如果返回state为success则说明创建完成,STARTED为正在创建
# total为快照总大小,processed已经创建的快照大小
# 下面这个例子就可以看出 总共有584305611769bytes,目前完成有3501037460bytes,还在快照中
GET /_snapshot/es_backup/snapshot_1/_status
"indexmapping" : {
"shards_stats" : {
"initializing" : 0,
"started" : 1,
"finalizing" : 0,
"done" : 0,
"failed" : 0,
"total" : 1
},
"stats" : {
"incremental" : {
"file_count" : 769,
"size_in_bytes" : 584305611769
},
"processed" : {
"file_count" : 32,
"size_in_bytes" : 3501037460
},
"total" : {
"file_count" : 769,
"size_in_bytes" : 584305611769
},
"start_time_in_millis" : 1659922770938,
"time_in_millis" : 0
}
}

# 查询所有快照
GET _snapshot/es_backup/_all
  • 恢复快照
1
POST /_snapshot/es_backup/snapshot_1/_restore
  • 跨服务器快照恢复

    我这儿采用的方法是将源服务器的快照存放的路径下所有的文件复制到目标服务器的快照存放目录中,然后使用恢复快照

快照参考1

快照参考2

安装IK分词器

docker中挂载时发现mac会出现.DS_Store文件,导致路径出错。删除该文件

1
Caused by: java.nio.file.FileSystemException: /usr/share/elasticsearch/plugins/.DS_Store/plugin-descriptor.properties: Not a directory

IK分词器有2种模式:ik_max_wordik_smart模式

  • ik_max_word (常用)最细粒度拆分
  • ik_smart 最粗粒度拆分
1
2
3
4
5
POST _analyze
{
"analyzer": "ik_smart",
"text": "南京大桥"
}

扩展IK分词器

自定义my.dic,引入IKAnalyzer.cfg.xml文件中

新建索引库

1
2
3
4
5
6
7
8
9
10
11
12
13
14
15
16
17
18
19
20
21
22
23
24
25
26
27
28
29
30
31
32
33
34
35
36
37
38
39
40
41
PUT /nba
{
"mappings": {
# 7之后这儿默认为_Doc,无需再定义books
"books": {
"properties": {
"birthDay": {
"type": "date"
},
"birthDayStr": {
// type 为keyword的字段不能进行分词
"type": "keyword"
},
"age": {
"type": "integer"
},
"code": {
// 类似于String
"type": "text",
// 分词器模式
"analyzer": "ik_max_word"
}
}
}
}
}

# es7之后默认为_Doc
PUT /my_test
{
"mappings": {
"properties": {
"keywordName": {
"type": "keyword"
},
"textName": {
"type": "text"
}
}
}
}

新增文档

1
2
3
4
5
6
7
8
9
10
11
12
13
14
15
16
17
// ES帮你随机生成id
POST /nba/books/
{
"birthDay":"2020-09-05",
"birthDayStr":"礼拜五",
"age":"4",
"code":"2312312DF"
}

// 自己指定ID为2
POST /nba/books/2
{
"birthDay":"2020-09-05",
"birthDayStr":"礼拜五",
"age":"4",
"code":"2312312DF"
}

查询数据

elasticsearch中match、match_phrase、query_string和term的区别

所有查询根据字段类型不同查询不同,以hello my mom为例子

  • term查询keyword字段 term不会分词。而keyword字段也不分词。需要完全匹配才可以。(必须匹配hello my mom一整个单词)
  • term查询text字段 因为text字段会分词,而term不分词,所以term查询的条件必须是text字段分词后的某一个(只能匹配hello或者my或者mom才能匹配到,直接匹配hello my mom则会失败)
  • match查询keyword字段 match会被分词,而keyword不会被分词,需要完全匹配才可以。(必须匹配hello my mom一整个单词)
  • match查询text字段 match分词,text也分词,只要match的分词结果和text的分词结果有相同的就匹配。(hello或者my或者mom或者hello my mom都可以匹配到)
  • match_phrase匹配keyword字段 (必须匹配hello my mom一整个单词)
  • match_phrase匹配text字段 match_phrase是分词的,text也是分词的。match_phrase的分词结果必须在text字段分词中都包含,而且顺序必须相同,而且必须都是连续的。(hellomymomhello my momhello mymy mom都可以匹配到,但是hello mom则无法进行匹配,因为不连续,my hello无法匹配,因为顺序相反)
  • query_string匹配keyword字段 (必须匹配hello my mom一整个单词)
  • query_string匹配text字段 和match_phrase区别的是,不需要连续,顺序还可以调换 (任何单词都能匹配)
1
2
3
4
5
6
7
8
9
10
11
12
13
14
15
16
17
18
19
20
21
22
23
24
25
26
27
28
29
30
31
32
33
34
35
36
37
38
39
40
41
42
43
44
45
46
47
48
49
50
51
52
53
54
55
56
57
58
59
60
61
62
63
64
65
66
67
68
69
70
71
72
73
74
75
76
77
78
79
80
81
82
83
84
85
86
87
88
89
90
91
92
93
94
95
96
97
98
99
100
101
102
103
104
105
106
107
108
109
110
111
112
113
114
115
116
117
118
119
120
121
122
123
124
125
126
127
128
129
130
131
132
133
134
135
136
137
138
139
140
141
142
143
144
145
146
147
148
149
150
151
152
153
154
155
156
157
158
159
160
161
162
163
164
165
166
167
168
169
170
171
172
173
174
175
176
177
178
179
180
181
182
183
184
185
186
187
188
189
190
191
192
193
194
195
196
197
198
199
200
201
202
203
204
205
206
207
208
209
210
211
212
213
214
215
216
217
218
219
220
221
222
223
224
225
226
227
228
229
230
231
232
233
234
// match_all查询所有数据
GET /nba/_search
{
"query": {
"match_all": {}
}
}

// 精确查询,不分词匹配
GET nba/_search
{
"query": {
"term": {
"birthDayStr": "礼拜五"
}
}
}

// 对某一字段进行多属性值筛选
GET /nba/_search
{
"query": {"terms": {
"birthDayStr": [
"礼拜五",
"礼拜六"
]
}}
}

// match对指定字段进行分词查询
GET /nba/_search
{
"query": {
"match": {
"birthDayStr": "礼拜"
}
}
}

// operator默认为or,也可指定为and,那么所查询的内容就必须包含所有分词出现的字段
GET /nba/_search
{
"query": {
"match": {
"birthDayStr": {
"query": "礼拜",
"operator": "and"
}
}
}
}

// 多字段查询,比如需要从birthDayStr字段和code字段中查找匹配的数据
GET /nba/_search
{
"query": {
"multi_match": {
"query": "礼拜四",
"fields": ["code","birthDayStr"]
}
}
}

// 指定字段返回 添加_source属性,指定哪些字段你需要返回
GET /nba/_search
{
"_source": "age",
"query": {"terms": {
"birthDayStr": [
"礼拜五",
"礼拜六"
]
}}
}

// 填入excludes属性,指定哪些字段不需要返回
GET /nba/_search
{
"_source": {
"excludes": [
"age"
]
},
"query": {
"terms": {
"birthDayStr": [
"礼拜五",
"礼拜六"
]
}
}
}

// 布尔查询

GET /nba/_search
{
"query": {
"bool": {
// 必须包括
"must": [
{
"match": {
"birthDayStr": "礼拜"
}
}
],
// 必须不包括
"must_not": [
{
"match": {
"birthDayStr": "六"
}
}
],
// 或者
"should": [
{
"match": {
"birthDayStr": "礼"
}
}
]
}
}
}

// 模糊查询
GET /nba/_search
{
"query": {
// 模糊查询
"fuzzy": {
"birthDayStr": {
"value": "礼物",
// 你的搜索文本最多可以纠正几个字母去跟你的数据进行匹配
// 这儿如果小于1 则搜索不到礼拜文字
// 这儿为1,则可以匹配任意包含‘礼’或者‘物’的语句
"fuzziness": 1
}
}
}
}

// 排序
POST /heima/_search
{
"query":{
"match_all":{}
},
// 根据字段进行排序,优先排序的字段放在前面
"sort": [
{ "price": { "order": "desc" }},
{ "_score": { "order": "desc" }}
]
}

// 高亮
GET /nba/_search
{
"query": {
"fuzzy": {
"birthDayStr": {
"value": "礼拜",
"fuzziness": 0.5
}
}
},
"highlight": {
// 设置高亮颜色
"pre_tags": "<font color='pink'>",
"post_tags": "</font>",
"fields": {
// 设置高亮字段
"birthDayStr": {}
}
}
}

// 分页
POST /heima/_search
{
"query": {
"match_all": {}
},
// 每页显示多少条
"size": 2,
// 当前页起始索引, int start = (pageNum - 1) * size;
"from": 0
}

// 2021-11-2 新添
// 完全匹配
GET /indexmapping/_search
{
"query": {
"bool": {
"must": [
{
"match_phrase": {
"paragraph.text": "原审判决定罪准确"
}
},
{
"match_phrase": {
"content.title": "杨松林犯奸污女青年申诉刑事通知书"
}
}
]
}
}
}
// 查询score得分情况 使用explain字段
GET /qa/_search
{
"explain": true,
"query": {
"match_phrase": {
"answerList": "春归"
}
}
}
// 查询去重 效率还是低了些
GET /indexmapping/_search
{
"query": {
"match": {
"content.title": "管列列与管四明排除妨害纠纷一审民事判决书"
}
},
"collapse": {
"field": "content.title.keyword"
}
}

修改数据

1
2
3
4
5
6
7
8
// 和新增类似,将新增的POST改为PUT请求,并带上id即可
PUT /nba/books/lmS0lHQBSXfBNsi69XZN
{
"birthDay":"2020-09-05",
"birthDayStr":"礼拜四",
"age":"4",
"code":"2312312DF"
}

删除数据

1
2
3
4
5
6
7
8
9
10
11
12
13
14
15
// 根据id进行删除
DELETE heima/goods/3

// 根据查询条件进行删除,因为是需要进行查询的所以用POST
POST heima/_delete_by_query
{
// 查询
"query": {
// 匹配
"match": {
// title字段中包含"小米"的数据
"title": "小米"
}
}
}

返回列表最大数量

1
2
3
4
5
## ES 默认返回数量为10000,超过则会报错,此时可以在kb中设置
PUT indexmapping/_settings
{
"max_result_window" : 200000000
}

使用HanLP分词插件

HanLP插件地址

HanLP地址

教程

要十分注意是否磁盘大小或者内存不够,如果不够会出现只读,不能进行操作

1
[FORBIDDEN/12/index read-only / allow delete (api)] - read only elasticsearch indices
  • 分词插件下载安装

./bin/elasticsearch-plugin install https://github.com/KennFalcon/elasticsearch-analysis-hanlp/releases/download/v7.5.0/elasticsearch-analysis-hanlp-7.5.0.zip

HanLP分词方式

  • hanlp: hanlp默认分词

  • hanlp_standard: 标准分词

  • hanlp_index: 索引分词

  • hanlp_nlp: NLP分词

  • hanlp_n_short: N-最短路分词

  • hanlp_dijkstra: 最短路分词

  • hanlp_crf: CRF分词(已有最新方式)

  • hanlp_speed: 极速词典分词

1
2
3
4
5
GET /blog/_analyze
{
"text": ["蓝翔给宁夏固原市彭阳县红河镇黑牛沟村捐赠了挖掘机"],
"tokenizer": "hanlp_dijkstra"
}

添加本地自定义词库

  • docker exec -it es /bin/bash

  • 在目录/usr/share/elasticsearch/plugins/analysis-hanlp/data/dictionary/custom中新增自定义词典:hotword.txt

  • 修改配置文件/usr/share/elasticsearch/config/analysis-hanlp/hanlp.properties在配置选项CustomDictionaryPath后添加hotword.txt

    1
    CustomDictionaryPath=data/dictionary/custom/CustomDictionary.txt; ModernChineseSupplementaryWord.txt;hotword.txt;ChinesePlaceName.txt ns; PersonalName.txt; OrganizationName.txt; ShanghaiPlaceName.txt ns;data/dictionary/person/nrf.txt nrf;

通过logstash将mysql数据导入ES

ES官方下载logstash,配置logstash-sample.conf

1
2
3
4
5
6
7
8
9
10
11
12
13
14
15
16
17
18
19
20
21
22
input {
stdin{}
jdbc {
jdbc_connection_string => "jdbc:mysql://localhost:3306/sport_test"
jdbc_user => "root"
jdbc_password => "135799"
jdbc_validate_connection => true
jdbc_driver_library => "/Users/mintaoyu/logstash-7.9.2/mysql-connector-java-8.0.16.jar"
jdbc_driver_class => "com.mysql.cj.jdbc.Driver"
statement => "SELECT * FROM basic_system_config"
}
}

output {
elasticsearch {
hosts => ["http://localhost:9200"]
index => "foodie-items-ik"
document_id=>"%{id}"
#user => "elastic"
#password => "changeme"
}
}

因为我的需求比较简单,详细参考网上

bin/logstash -f config/logstash-sample.conf执行

赏个🍗吧
0%